Recording
Capturing area defining
Before recording you can set the screen's area to be captured.
This area is defined by Bounds Frame object.
You can resize this Frame and move it in necessary location by mouse Drag and Drop operation.
Also, you can use the keyboard:
- to move Frame press keys "Up", "Down", "Left", "Right";
- to change the size of Frame hold pressed "Shift" key and press keys "Up", "Down", "Left", "Right".
In the new project, the initial size of capturing area
is equal to size of the computer's desktop.
If the project contains any captured screenshots already, it is
impossible to change the size of capturing area (but you can change its location).
Recording
To start recording choose the command "Start" from menu Record or click the corresponding button on the Toolbar.
The dialog "Recording parameters" will be opened.
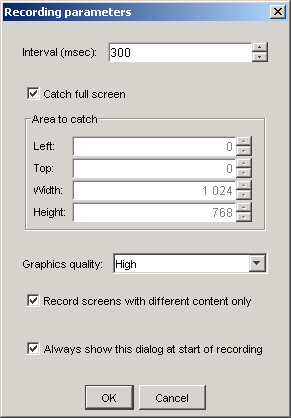
In this dialog you can set next parameters:
Interval between two sequent screen capturing events.
This interval does not include
the time of capturing and saving to file processes, so the bigger size of
capturing area, the less frequency of sequent catching events.
Note. The less capturing interval you set, the less time other
applications (work of those you are recording) can work. So you need
choosing compromise settings.
Quality of graphics to be recorded.
Use low graphics quality to minimize the size of generated movie.
See
Tips and Tricks paragraph for recommendations about how to work in this mode.
If you do not check this flag, Recorder will capture all screenshots
even if screenshots are equal by content and differ only by mouse cursor position.
This mode records more real mouse motion.
After you pressed the button "OK", the window of Recorder will be minimized and
recording will be started after 2 seconds.
After you finished all necessary activity, maximize Recorder window
and stop recording session using the command "Stop" from menu Record
or clicking on the corresponding button on the Toolbar.
Recorder deletes equal sequent screenshots if necessary and displays the first
captured screen.
Recurring recording
You can always extra record any additional screens inside the already captured screenshots sequence.
Just navigate to the screen, after which you want to add new recorded screenshots, and start recording.
Also you can capture single screenshot using the command "Photo screen" from the menu Record.
This captured screenshot will be added after the current screenshot.
 Return to Contents
(C) AtPresent Software 2004-2006. All rights reserved.