Recording
Before start recording you can set an area to be captured by resizing and
moving of
Bounds Frame object.
If you are recording desktop for the first time in a new project, the initial size of
Work area and of Bounds Frame
will be equal to size of your computer's desktop.
If you want to start another recording session in the project that has captured screenshots
already, you can not change the size of catching area.
You can start recording by clicking on  button on the Tool bar
or using a command "Start" from menu Record.
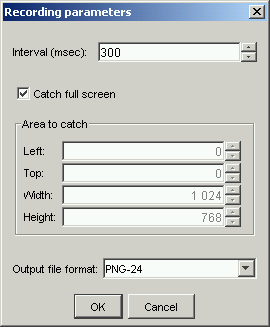
A dialog "Recording parameters" will be opened.
In this dialog you should set next parameters.
Interval between two sequent screen capturing events.
This interval does not include
the time of capturing and saving to file processes, so the bigger size of
capturing area, the less frequency of sequent catching events.
Note. The less capturing interval you set, the less time other
applications (work of those you are recording) can work. So you need
choosing compromise settings.
Area to catch (full screen or concrete values of area's location and size).
Format of image file to that screenshots will be saved (PNG-24 or PNG-8).
After you pressed the button "OK", the window of Recorder will be minimized and
after 2 seconds recording will be started.
When you finish all necessary activity, you should maximize Recorder window
and stop recording session by clicking on  button on theTool bar
or using a command "Stop" from menu Record.
Recorder deletes equal sequent screen shots and displays the first
screen inside the Work area.
 Return to Contents
(C) AtPresent Software Co. 2004-2005. All rights reserved.
 button on the Tool bar
or using a command "Start" from menu Record.
 button on the Tool bar
or using a command "Start" from menu Record.
 button on theTool bar
or using a command "Stop" from menu Record.